A blog about android devices and their customization, using Custom ROMS tutorials for installing the custom ROM on various android devices.
Saturday, September 14, 2013
Latest must have apps on Android.
We have already seen few of must have apps on your android device,Let us add more to that count.
These are some good apps I came across and found very useful.
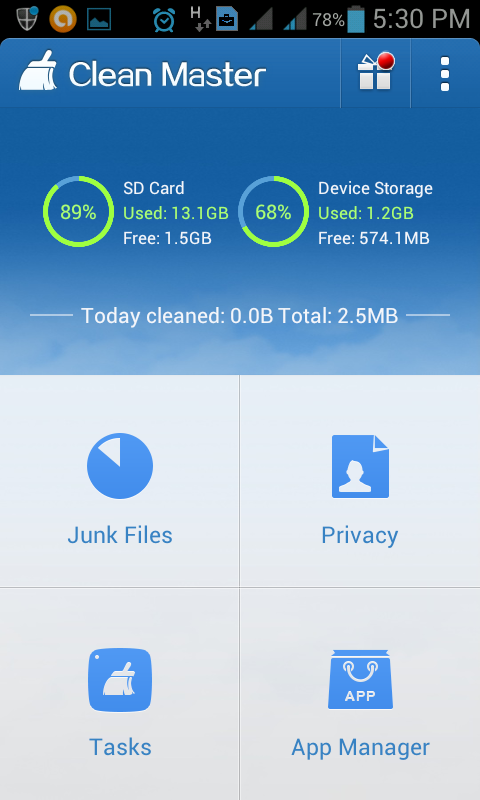
- Clean Master:-
If you are using a budget android device and facing the problem of lagging speed due to over utilization of RAM, then boss you should have this app on your phone, As the name suggests this app will clean up the memory (RAM) in order to keep your device running on speed when you needed most. It also supports a one tap widget that would clean the shit by just tapping. There is option to choose the reminder for cleaning up the RAM based on the used space and you can also schedule the cleaning process.


- Software Data Cable
Need to transfer data, don't have USB cable...don't worry you wont need it again. This is the application which will allow you to transfer the data from your device to your Computer or from your device to other device and vice -verse. It uses the Wi-Fi tethering principal to share data with other devices, it also supports the sharing when your device and Computer is connected to same network, very soon they are going to introduce cloud support too..
It will be just amazing to share the data over cloud.
- Super Backup: -
Well if you are continuously changing your android smartphones, or the ROM used for your android i.e using and changing to a new custom ROM often, then this the app for you.
The basic need before switching a device or ROM is to have all your personal details backed up now a days these personal details also includes apps..:-). Super Backup allows you to take back up of your Contacts, Messages, Call Logs, Applications,Calenders and Bookmarks...what else you need. It also takes its own backup and is capable to restore them all on any other device or same device provided that the back up folder is on SD CARD and can be moved to the desired place
- Shush..
This is the most useful and smallest app you will ever come across. This application is very useful for the people who always forgot to move their device to ringer mode once they are out of meeting, and became the victims of their husbands/wives/boyfriends/girlfriends doubtful attitude...:-P
Once you install this app, you will notice that while making your android's ringer silent by pressing and holding volume down key a new window will pop up which simply asks you the duration for which you want to keep the ringer shushed..that's it. Isn't is so funny..once the duration is passed and your device will be on ringer mode again...now no need to worry for missing important calls from your loved ones because of silent ringer..
You know this is what make android "Smart" phone.
Friday, September 6, 2013
Which is the best launcher for your Android..?
Before we actually give the answer to the question above, Lets get an idea about what is launcher (for Android newbies others can skip this part)
A launcher is nothing but the UI of your device, from which rather trough which you are able to access all other features of your device.
Without a launcher you can not even call from your device, Launcher is the basic and unavoidable need of the Smartphones.
Now as you know what launcher is let us see the difference between stock launcher and custom launcher.
Stock launcher: - is the launcher by default which comes with your phone as a manufacturers design, Below is the list of top android manufactures and the launcher they provide
The stock launcher can be replaced by two ways.
In case if you messed up and after restart you don't see the custom launcher running (this may happen with Micromax Devices) but a complete black screen, don't panic just install any other launcher from Play store or the launcher you want to try (if its available on Play Store).
Once the launcher is installed click the notification which in tern will open the launcher and you will get access to internal applications.
A launcher is nothing but the UI of your device, from which rather trough which you are able to access all other features of your device.
Without a launcher you can not even call from your device, Launcher is the basic and unavoidable need of the Smartphones.
Now as you know what launcher is let us see the difference between stock launcher and custom launcher.
Stock launcher: - is the launcher by default which comes with your phone as a manufacturers design, Below is the list of top android manufactures and the launcher they provide
- Samsung---Touchwiz UI
- Sony---Xperia Home
- LG--LG UI3
- HTC---Sense
- Micromax-- Mlabs
- Karbbon--ICS home
Custom Launcher:- is any other launcher than your stock launcher, :-)
By installing a custom launcher you can actually change the way you feel your UI, You can also try with the other manufacturers launcher in your device but not all the launchers support all the devices. With custom launcher you can also re-size the widgets and add all the other stuff that stock doesn't support
Apart from these there are numerous custom launchers available few of them are
- Holo launcher
- Nova launcher
- Next Launcher
- SPB shell 3d launcher
- Go launcher
- ADW launcher
- Apex launcher
- And many more....
As we move further we will see how to replace the stock launcher completely, or install a new one.
Launcher is the integral part of your device, without it your device is nothing,
so it becomes necessary to have the best launcher running on your device.
There are few points to be considered while replacing the launcher
- Check out the performance of existing launcher, like how much RAM it occupies when active and running in background
- If you are getting too slow responsiveness from your launcher consider changing it, it irritates you horribly
- Make sure you have back of your existing launcher, though it may be bad enough, in case if some happens while replacing the launcher at least you wont loose the access to your device
- Before narrowing down your choice of the custom launcher its always recommended to check the reviews of other users actually using the launcher
- Now you are ready to Go follow the procedure below.
1. By completely removing it
2. By simply Installing new one and setting it as default launcher
1. By completely removing it
In this case you will not be able to switch to the stock launcher immediately but of course you can restore your stock launcher from back up.This case is advisable only if despite having other launcher as default the stock launcher is running in background and consuming more resources
Note :- To remove your stock launcher completely you must have root access
To know how to root your device follow this link.
Assuming you have root access and a Root Browser application follow the steps below
- Go to root /system/app folder and find your stock launchers .apk file move that file to other location on your sd-card and place the custom launcher that you would like to try in this location (/system/app)
- This way you are just replacing the launcher file, but there are many other files associated with launcher, its better no to remove them, as it may affect the other operations in system
- Once this is done restart the device and you shall get a new launcher with new experience
2. By simply Installing new one and setting it as default launcher
This is the simplest method and very clear from name itself,
you just need to install the custom launcher and set is a default by pressing home key and checking the option set as default.
This method is advisable for those who don't bother about the stock launcher running in background and have plenty of RAM to accommodate the new custom launcher.
In next post we'll see a comparison overview of few top launchers available out there such as Go launcher, Jelly Bean Launcher,Holo, Apex, Nova and many more
Monday, September 2, 2013
How to improve the Performance (Speed, RAM, Battery) of your Android Device
For today's android devices average battery life is 1 day, we will see how to improve all the characteristics that in tern help increasing battery life and performance.
Follow the below mentioned checklist
- First thing to check is the capacity of your battery it is mentioned in your devices manufacturer box or you can directly check it on the battery, the term is mentioned as MaH (Mili ampere Hours) e.g. 2000MaH
- This indicates the capacity of your battery and how much strength is provided to your android device
- Other part is to check what all sensors your device have excluding the common ones (proximity,gravity). This interns help you to know what is draining your devices battery
- If you are not using your Wi-Fi, GPS actively all the time disable it, as far as Wi-Fi is concerned it has option to auto disable when screen turns off, but GPS doesn't comes with this option.
- Install best battery saving application from play store as of now Juice Defender is best
- Check the performance of your fully charged battery for entire day without recharging in whole day, you can check it in Settings->Battery
- It will give you clear idea what is eating the juice
- If your device have auto brightness option; use it ,it helps to increase your battery life almost 10-20%
- There is one more thing that drains your battery but you never notices it that is your processor, The highest capacity processor you have the high amount of battery consumption is made by device. To tackle this issue you can set up the CPU speed and tie it with various profiles. There are various applications like Set CPU, ROM Tool Box etc which actually helps you to monitor the speed of CPU, all these applications need root access, To know how to gain root access follow this link
Improving Speed and Ram optimization
- As we have seen above the CPU speed is a key part in performance of your android. There are various options available like over clocking your CPU speed to higher one by installing new kernel which supports overclocking check out this post for Samsung Galaxy S duos
- RAM of your device is also a key part in performance, to improve RAM optimization again you need to have supporting kernel and of course root access
- There are various options available to increase your existing RAM by adding swapping file on SD card, and they do work great.
- Below are some links you may find useful

Sunday, September 1, 2013
Overclocking (OC) Samsung Galaxy S Duos GT-S7562 to 1.2 Ghz
Samsung Galaxy S duos is now becoming a budget smartphone, It offers specifications such as 1 GHz processor, 765MB RAM 2 GB Internal memory and 5 megapixel Rear camera with 1.3 MP front camera for supporting video calling.
However with extensive use of this handset it becomes little lagging.
To overcome this you need to update the device with custom ROM, Fortunately and unfortunately there is only one custom ROM available for this handset
follow this post.
There is one more option of overclocking your existing processor speed to higher i.e. (1.2GHz ) and for doing that you need to have your S duos rooted with CWM recovery check this post if you haven't rooted yet and this for getting permanent CWM for S duos
Overclocking means that increasing the clocking period which intern
increases the speed of processing any instruction by processor.
To overclock you need to install the supported kernel there are few kernels available for S-DUOS which supports overclocking
Below are the links from xda for these kernel's
Note :- While installing a custom kernel if you dont follow the mentioned procedure accurately you may brick your phone. Read instructions twice before actually doing it
The Kyle open ROM kernel can be installed through CWM recovery, but for the breakfast kernels you need to install them using ODIN
Just follow the steps below to install using ODIN
However with extensive use of this handset it becomes little lagging.
To overcome this you need to update the device with custom ROM, Fortunately and unfortunately there is only one custom ROM available for this handset
follow this post.
There is one more option of overclocking your existing processor speed to higher i.e. (1.2GHz ) and for doing that you need to have your S duos rooted with CWM recovery check this post if you haven't rooted yet and this for getting permanent CWM for S duos
Overclocking means that increasing the clocking period which intern
increases the speed of processing any instruction by processor.
To overclock you need to install the supported kernel there are few kernels available for S-DUOS which supports overclocking
Below are the links from xda for these kernel's
Note :- While installing a custom kernel if you dont follow the mentioned procedure accurately you may brick your phone. Read instructions twice before actually doing it
The Kyle open ROM kernel can be installed through CWM recovery, but for the breakfast kernels you need to install them using ODIN
Just follow the steps below to install using ODIN
- Download the desired speed kernel on your desktop
- Get your device in downloading mode
- Connect the device to computer using USB cable
- Once the ODIN detects device and one of the COM port turns yellow
- Select the downloaded kernel under the Box PDA
- Make sure no other option is enabled except Auto reboot and F.reset time
- Click on start and wait til the port turns green and shows pass message
- Reboot your device and Enjoy
- KyleOpen ROM Kernel OC1 - Bleeding edge kernel with increased sensitivity, all features activated and custom boot logo image.
- xvasek2 - Breakfast Kernels - OC Kernels for everyone, plenty of speeds to choose from. If you really want OC and can't get around with any setup, use these kernels confidently. Don't forget to follow the instructions and check your balls (or instincts for the ladies!) before you proceed. All kernels should be flashed using ODIN.
Subscribe to:
Posts (Atom)